The following post is showing the installation of IBM
Webspere MQ version 9 on CentOS 7 (64 bit) platform. You can download the trial
software from IBM site.
In this
post:
- ü Setup WebSphere user and Group
- ü Kernel Configuration Parameters
- ü Read and Accept License
- ü Install WebSphere MQ Components
- ü Post Installations
- ü Verifying Installation
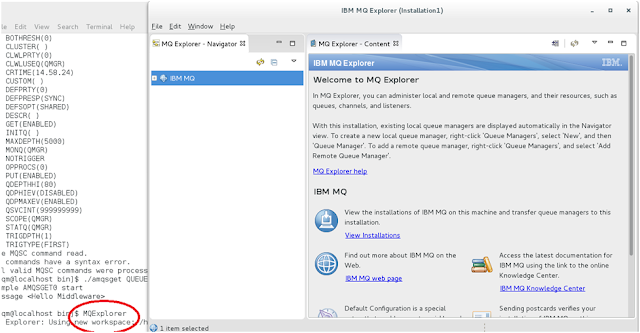
- ü Start WebSphere MQ Explorer GUI
1. Setup WebSphere user
and Group
On UNIX like systems, WebSphere MQ requires a user ID of the
name mqm, with a primary group of mqm to own the directories and files of
the product. WebSphere MQ installation will automatically create the user and
group for you. However you may want to setup in advance
Login to the system as user root then create user and group
as follow:

To make the following
kernel changes log as user with root authority. Open the file "/etc/sysctl.conf" then add or
change the following entries to the values shown (if the existing values in
file are greater than these values do not change)
|
kernel.shmmni = 4096 kernel.shmall = 2097152 kernel.shmmax = 268435456 kernel.sem = 500 256000 250 1024 fs.file-max = 524288 kernel.threads-max = 30000 |
Then save and close
the file. To load these sysctl values immediately, enter the following command:
|
mqm
hard nofile 10240 mqm
soft nofile 10240 |
3. Read and Accept License
While login as root set your current working directory to the
installation files. Run the "./mqlicense.sh -text_only" command to
read accept the license issues or run "./mqlicense.sh -accept"
command to accept the license without displaying all text (You must accept the
license compliances otherwise you won’t proceed with installation):

At minimum Webspere MQ server installation you must install MQSeriesRuntime and the MQSeriesServer components. However, this example show the minimum installation of the following components

Log in as root, or switch to the superuser by using the su command. Set your current working directory to the installation files. To install to the location, "/opt/mq9" use the "rpm –ivh" command to install each component as follow

After the installation has completed, run the '/opt/mq9/bin/mqconfig'
command, using the 'mqm' user ID.
For example, execute the following statement when running as the 'root' user:
su mqm -c
"/opt/mqm/bin/mqconfig"
The 'mqconfig' command validates that the system
configuration satisfies the
requirements for WebSphere MQ, and ensures that the
settings for the 'mqm'
user ID are suitably configured. Other WebSphere MQ administrators in the
'mqm' group can run this command to ensure their user
limits are also
properly configured to use WebSphere MQ.
If 'mqconfig' indicates that any of the requirements
have not been met,
consult the installation section within the WebSphere
MQ Information Center
for details about how to configure the system and user
limits.
Run the su mqm -c "/opt/mqm/bin/mqconfig" command as suggested to validate
configurations

Install other components

5. Post Installations
If you have chosen this installation to
be the primary installation on the system, set it as the primary
installation. Execute
MQ_INSTALLATION_PATH/bin/setmqinst -i -p MQ_INSTALLATION_PATH where
MQ_INSTALLATION_PATH represents the directory where WebSphere MQ is installed.
Example

If you want to set up the environment to
work with this installation use setmqenv command to set various environment
variables for a particular installation of WebSphere MQ

Check that the environment is set up correctly using dspmqver command as follow

6. Verifying Installation
To verify installation configure the
default queue manager, use the amqsput sample program to put a message on the
queue, then use the amqsget sample program to get the message back from the
queue


Change into the
MQ_INSTALLATION_PATH/samp/bin directory. Execute "./amqsput QUEUE1
QMA" command, type the message e.g. "hello middleware" then
place enter twice

Get the messages from the queue as follow:

And
curdepth count is as below.

Log in as a user in the mqm group then
run MQExplorer command
No comments:
Post a Comment